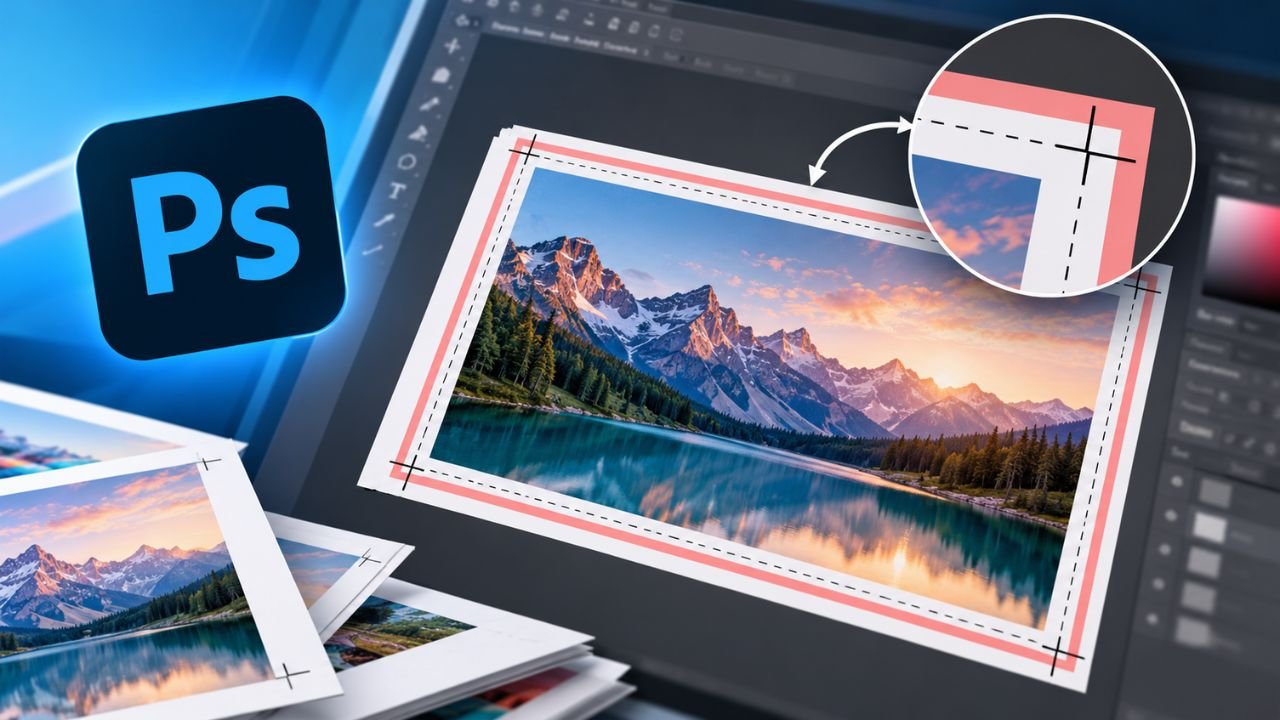
The process of adding bleed and crop marks to your design using Photoshop helps to prepare it for professional printing. Bleed is used to give the printer extra space around the design, while crop marks indicate where to cut the paper.
Unfortunately, there isn’t one easy option in Photoshop for automatically adding bleeds and crop marks, so you have to create the bleed area, extend your design outwards, and add the crop marks prior to saving it for print.
This article will show you a simple way of adding bleed and crop marks to your design using Photoshop. You will also learn about what export settings to use, as well as how to avoid common mistakes which can happen during the printing process.
Table of Contents
What Are Bleed and Crop Marks?
Before understanding bleed and crop marks, it is essential to know its features.
Bleed refers to the area that sits outside the borders of a design. That way the background colour, photographs, or any design can go further out beyond the size of the cut. Hence, it eliminates the issue of small errors in cutting.
On the other hand, crop marks are small guides on the designs that will help the printer identify the margins down to the size of the print.
For example, if one wanted to design a business card of size 3.5 × 2 inches, they would have to go ahead and add an extra 0.125-inches bleed for each side which means the piece will be larger than the final size.
So it is important to consult with the printer beforehand to know the necessary file settings and bleed information.
Step 1: Create Your Photoshop Document
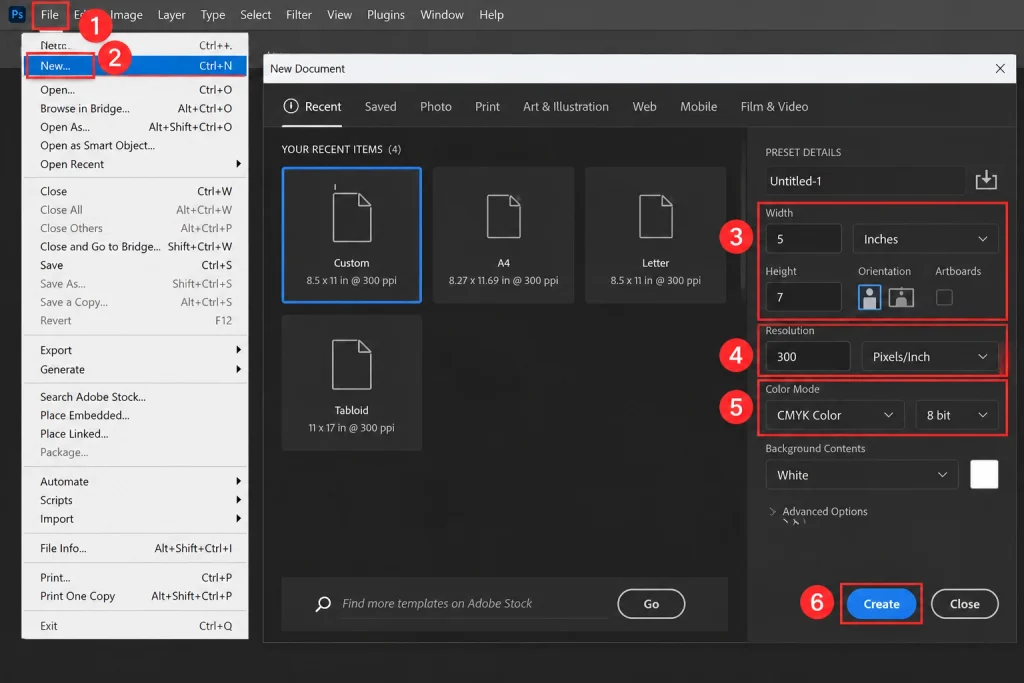
Open your Photoshop application and create a new document for the project.
Go to File > New.
Input the required dimensions for the finished printed design.
Remember to set the pixel density to 300 Pixels/Inch since this is the standard resolution for printing works unless otherwise specified by your printer.
Choose the color mode you need. In many cases, CMYK is a good choice for your project, but be sure to refer to your printer’s requirements first.
Click Create.
For example, if the flyer you are printing measures 5 × 7 inches, you would specify this size as the document size.
Then, you should save the document in PSD format, since this allows you to make edits to your project later.
Step 2: Add Bleed to Your Document
Unfortunately, Photoshop does not possess a bleed feature unlike some page layout applications. However, you can easily create a larger space with a few adjustments to your overall canvas size.
To create a bleed, you need to follow the below mentioned steps:
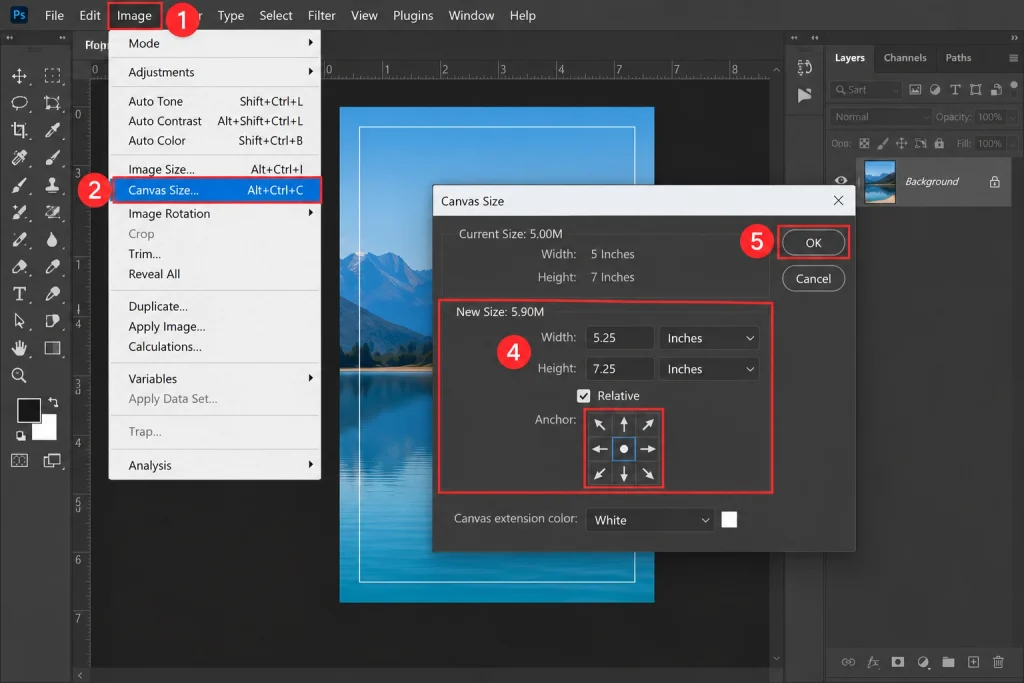
Under the Image Menu, select Canvas Size.
Ensure that the dimensions for your canvas are specified in inches or any other measurement system used by the printer.
Click the center anchor point option to ensure the extra spacing is added evenly.
Increase the height and width values in order to accommodate your bleed size.
Click OK to confirm changes.
For instance, if your final design is 5 × 7 inches with 0.125 inches of bleed all around.
Your new canvas size will be:
Width = 5.25 inches
Height = 7.25 inches
This gives an extra 0.125 inches on both height and width.
It is important to know that increasing canvas size will not cause your art to spill over into the extra area. You must extend the background colors or pictures into the extra area to fill it up.
Step 3: Extend the Artwork Into the Bleed Area
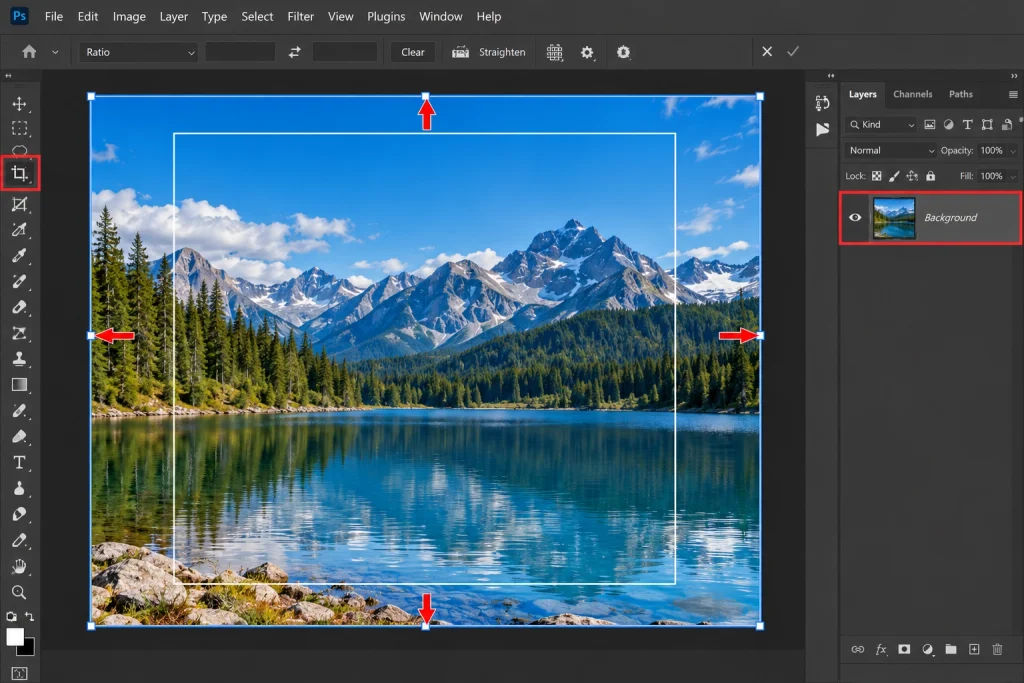
Once you have enlarged your canvas, you will want to ensure your design extends to the newest edges of your canvas.
Solid background colors can be carried over to fill the added canvas space, while images can be resized using the Crop Tool, moved, or edited in some way to fill the new edges.
If your design features photographic images, you may also want to examine using the Content-Aware Fill (CA) Feature. In this instance you will have a much better chance for success, but be certain to pay close attention to the resulting output to avoid unplanned patterns or distortions.
Make certain not to include anything important (text, logos, or other significant elements) too close to the final trimming line.
Step 4: Show Guides for the Final Cut Size
After you have extended the state of bleed, place the final size guides onto your design.
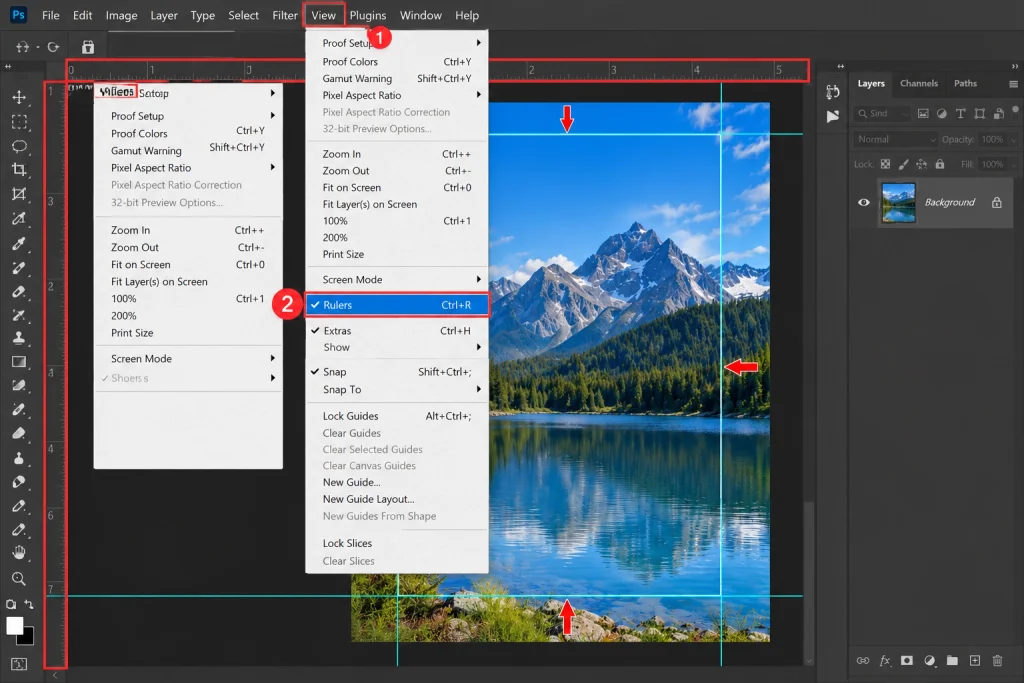
Open View > Rulers to show the rulers.
Drag from the horizontal & vertical rulers.
Place the guides on the final edged area of your finished design.
For a design size of 5×7 inches with 0.125 inches that has bled out, you start your final cut area location at 0.125 inches in from the top bottom left side of the canvas that has been increased in size slightly at 5.25 inches by 7.25 inches across.
Now place these guides so that they indicate your final 5 by 7 cut area with the bled material around it which will remain there until the cutting process takes place.
Step 5: Add Crop Marks in Photoshop
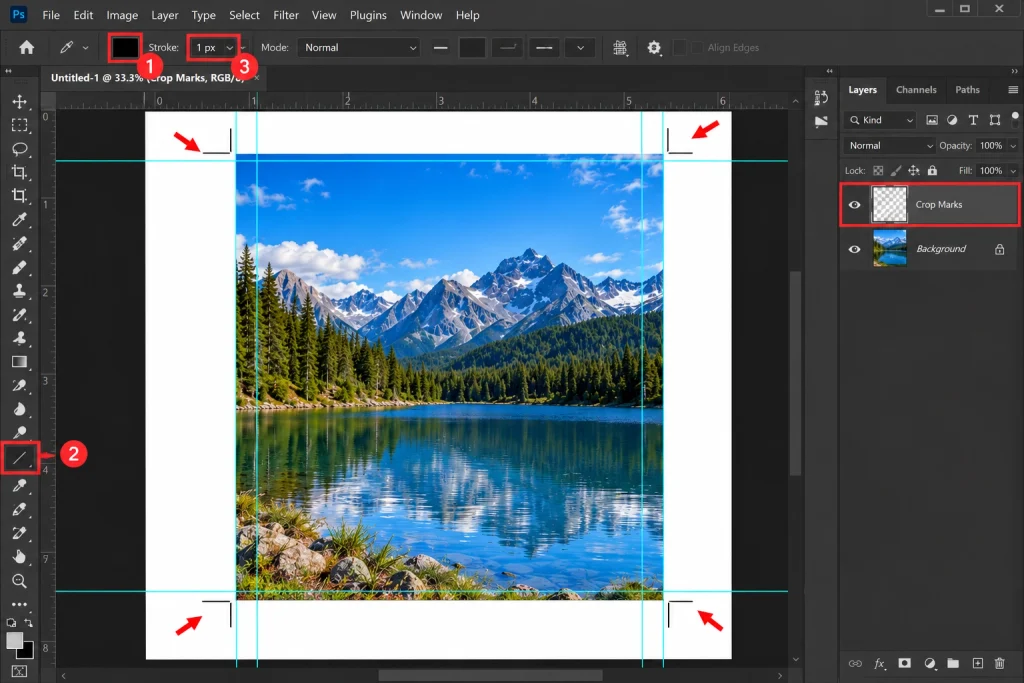
Photoshop lacks the automated crop marking features that are available in other dedicated layout printing programs but you can create crop marks manually via the use of the Line Tool.
To create crop marks:
Create a new layer called Crop Marks
Use the Line Tool from the toolbar
Use the color black for your line and adjust the line weight according to the strength of the output. A weight of one pixel should be adequate depending on the document resolution as well as the requirements from the printer.
Draw small lines outside each of the four corners of the cut area.
Make sure that you draw the lines outside of the document artwork and that there is a separation between the design and the lines.
Every corner must have two short lines, one horizontal and another vertical; both must allow the printer to know where to cut the paper.
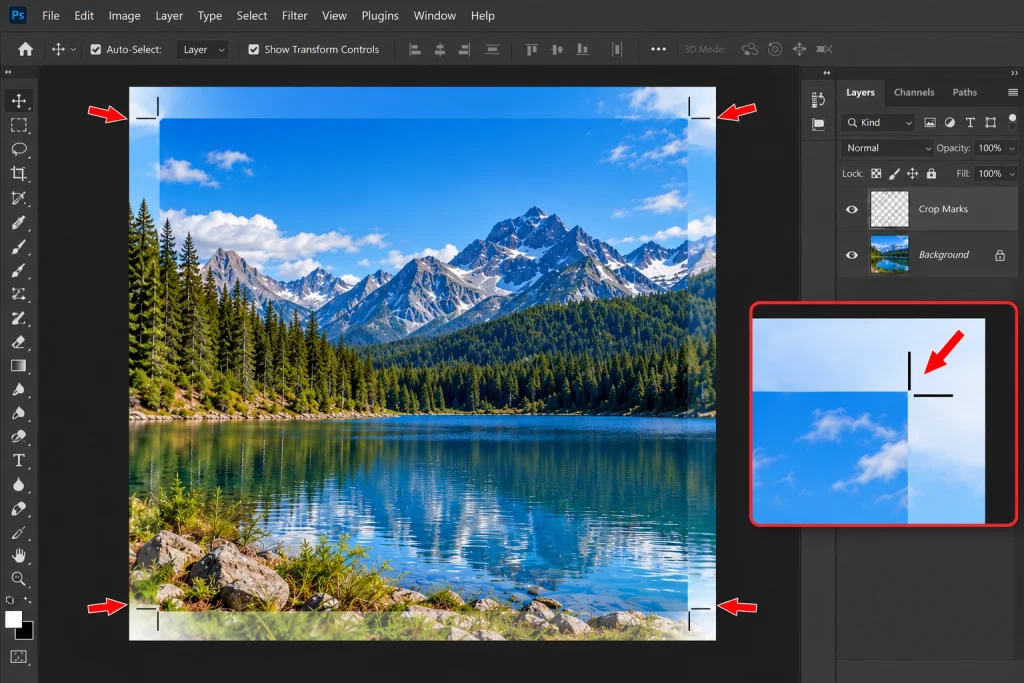
You can zoom in as much as you can in order to get more accuracy using the guides selected in the previous step. Make sure that the crop marks do not overlap with the artwork.
There is a very important requirement in the crop marking procedure. It is important to note that crop marks must be outside bleed region if necessary since this may not be suitable for your printer. Therefore always check the required distances before preparing the final file.
Step 6: Check Your Bleed and Crop Marks
After exporting, double-check to ensure your document is correct. A quick check saves hassle and time down the track.
Your background and images extend into the bleed.
The text and logos are in the safe area.
The guides reflect the final cut size correctly.
The crop lines are outside your design.
There are no unnecessary white spaces at the edges.
The dimension of the document matches that of the printer.
Now hide the guides that may make reviewing the work problematic. Do not delete your crop-mark layer if you want it exported with your design.
Step 7: Save and Export the File
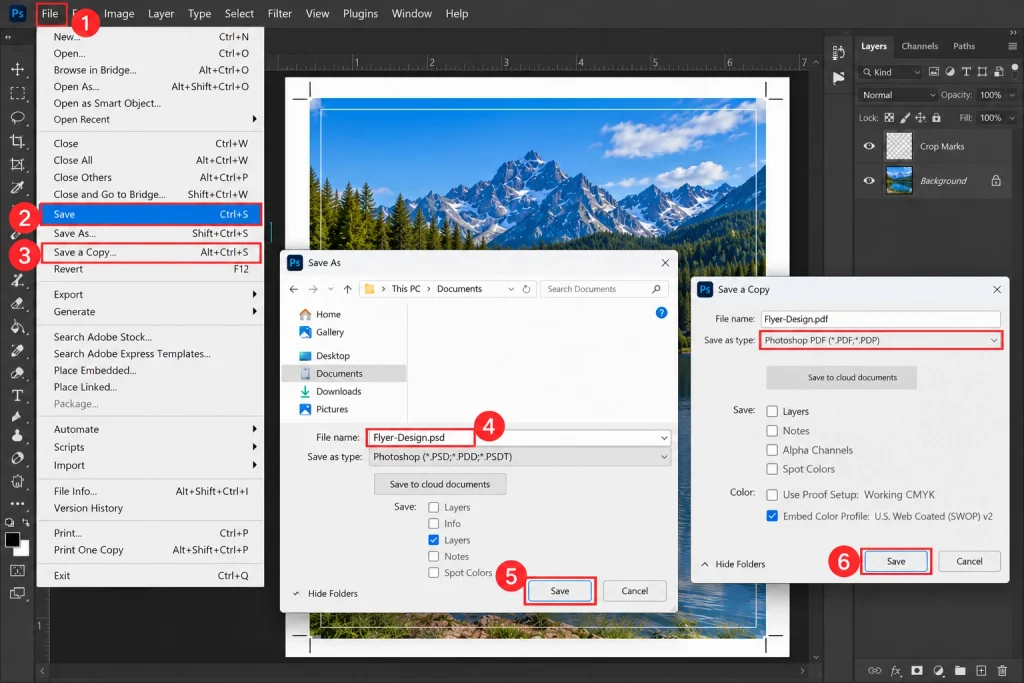
In the end, save your design in the editable format first by going to File > Save as and saving your design in the PSD format. This ensures that your layers, guides, and other editing details are preserved.
The best export format for printing depends on how the printer works. In general, a PDF will be the highest quality for most printers; you may need to use the TIFF format for some print jobs.
Choose File > Save a Copy in case you need a PDF, or you can use the PDF command in your version of Photoshop. Use an appropriate quality setting and check the file before sending it.
You should note, however, that the PDF options found in Photoshop do not allow for the same bleed and printer mark controls as dedicated page layout programs. If you need your PDF to have a specific bleed box, trim box, or automatically generated crop marks, you should use another page layout or PDF production tool for producing that.
Once you have exported your design, check the resulting file carefully to ensure that your artwork and any bleed and crop marks look correct.
Can You Add Crop Marks Automatically in Photoshop?
You can. There is also a built-in crop mark option for the print job when printing directly from the application.
To do this, go to File > Print, select Output and turn on the option for Corner Crop Marks. You may also select the option for Center Crop Marks if necessary. Your paper needs to be large enough to accommodate the image you created and the marks.
Photoshop
+1
However, these are print output settings. This does not replace having a proper bleed setup when saving a PDF. You will need to check with your printer to find out the proper format for them to ensure your file is print-ready with defined bleed and trim areas.
Final Thoughts
Adding bleed and crop marks in Photoshop is quite simple once you have your understanding straight with regard to the extra art area and cutting lines. First, you have to enlarge the canvas to accommodate the bleed area. After this, you will apply the necessary artwork and set your guidelines for the final size. After this, you will set your crop marks.
Depending on your settings, make sure to save the working PSD file and verify your final print output before you send it to be printed out. Above all, make sure to double-check with your specifications so that you do not have any white edges or incorrect cutting to any graphics or artwork.
HowFixer is your trusted source for tech solutions. We provide easy "how-to" guides for gadgets, tools, apps, social media, and everything tech-related. Simple fixes. Smart tech. All in one place.